Posts

Showing posts from September, 2011

Waterfall Card Workshop.

Image
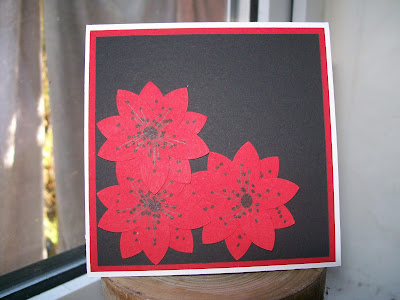
Next Tuesday will be my first October Workshop of the month - our subject this time is Waterfall Cards. Here's one I made as an example It uses the very gorgeous Greenhouse Garden and if you would like details of this - and other workshops hop over to my Craft Club Blog  here . There will also be a materials list and I will also post a full tutorial on the day on how to make this card. Before I go here is a shot of the card in motion Jacqueline xx.

Pop-up Poppy Card.

Image
The card I have made today is very similar to one I demonstrated at my workshop last week. It's called a 3D Flower Pop-up Card and this is what it looks like: If you would like to see a tutorial on how to make a card like this - pop over to my  Craft Club Blog  and take a look. My Craft Club Blog was set up mainly for the ladies of my craft group, I post pictures of the projects they will be making at my workshops and I also post a materials list. If any can't make it on the day or forget how a card was made I post a full tutorial for the project there too. However any on-line crafter can take advantage of the tutorials and have a go at making the projects too. Next week we will be making Waterfall Cards and very soon there will be Christmas projects for you to see. If you are a blogger you can follow the tutorials in the usual way but you can also sign up for e-mail updates - that way hopefully no one misses out. O.K I'm off now to make my Waterfall Card........

Just Us Girls - DT Call

Image
There is a DT Call over on  Just Us Girls  and I think I have made it by the skin of my teeth! I found out about it a week ago but since then I have had kittens at the vets having operations and my daughter leaving for university and it got pushed onto the back burner till today. The first part of the challenge was to make a card or scrapbook layout using this sketch Here is my card The next thing to do was create a project using a 3D template - take a look: This is a fabulous little box made out of some card I bought at my local supermarket - it's really thick and perfect for making boxes, unfortunatly though I can't give any colour names. The decoration is flowers made from some Marianne D Creatables dies. But the best thing about this box is when you open it up it looks like this: As you open the box there are four little boxes inside that are arranged in steps then as you close the box they fold neatly away inside. Thanks for taking the time to look t

MMM - Challenge 17 - Steampunk Anything But a Card

Image
This week for the challenge at  Make My Monday  I have let my hair down. The challenge is ANYTHING BUT A CARD and I had SUCH FUN  making this! I hope you like it - take a look I started off with a tiny canvas that I bought at The Works. I painted it with white acrylic paint and then added some Bushed Corduroy Distress Ink. My understanding of Steampunk is industry with a fantasy twist, so hence the title of my work - Hive of Industry. The bee hive is achieved by stamping through some sequin waste (a favourite technique of mine) and the bees are stamped using Stampin' Up - Nature Walk. Some cogs have been added and some Maya Road chipboard wings - distressed with Brushed Corduroy ink and some gold acrylic paint. A metal corner was added and a tiny cork stoppered  bottle labeled Bee Wing! The cogs were taken from from a very old broken clock and I just had to use the pendulum - just because I liked it! Please hop over and have a go - I  certainly don't pretend to unde

Colour Challenge at Simply Stampin'

Image
This week at the  Simply Stampin'  challenge blog they have a colour combo for us Guess what - I actually have all the colours this time! My card uses stamp sets French Foliage and Pocket Silhouettes - take a look There is a background mat of Chocolate Chip card stock with another mat of Very Vanilla on top. This has been stamped in Pear Pizzazz ink with the french script from French Foliage down one side and the ink splodge down the other - in Chocolate Chip ink. A band of Soft Suede card stock has been punched with the scallop edge punch and a strip of Very Vanilla has been placed on top of that. The little picture has been stamped with the Pocket Silhouettes in Pear Pizzazz and Chocolate Chip inks - this has been matted onto Soft Suede card stock. Finally one of the leaf stamps has been inked with Pear Pizzazz and then dabbed with the Chocolate Chip ink, stamped and cut out - three times and these have been stuck on with 3D foam tape. There is also a DT Call running

A Fond Farewell.

Image
Yesterday I left my little girl at University - after weeks of chaos of her attempting to 'pack' and a final week of last minute shopping, packing and farewell parties she is there. She is actually at Aberystwth (bet I've spelt that wrong!) Uni about to start a maths degree and we left quite early in glorious sunshine but as we drove deeper into Wales the clouds descended and in was pouring when we arrived. It took us ages to meet up with her as we had gone in separate cars but we eventually met up and found her room at the top of a hill - we had parked at the bottom. Many journeys later the cars were unpacked and we were very wet! With luck everything fitted in her room - just, and we left late afternoon - both Mother and Daughter in tears (still am actually as I write this). However got halfway home and received text 'met up with a flat mate - going out for a night on the town' - no change there then! So I have a very sore back this morning and I can feel a long

Good Luck Card.

Image
Here as promised is my second  Less is More  card. Now whilst I may be wishing the LIM Ladies good luck in their attempt to achieve 1000 submissions this week, this card is also for my daughter who leaves us for university on Saturday. It's a one layer card - the spotty frame was stamped first and then covered with a post it note mask. The flowers are from the Baby Blossoms set and I used Blushing Bride, Rich Razzleberry and Old Olive inks. Have to go now - said daughter is turning the house upside down in her attempt to pack! See you soon - Jacqueline xx

Baby Blossoms Owl.

Image
It was so gloomy, wet and grey this morning that I decided to make a bright and cheerful card. My Baby Blossoms stamp set has been out on my work desk for a while now so I thought I'd give it one more airing before I put it away. As always Bev was round for our usual coffee, craft and chat and Louise popped round too - we had great fun but my card seemed to take on a life of it's own and ended up totally different to what I expected it to be! (Too much chat with not enough concentration me thinks!!). Any way take a look I used a variety of colours from the In Colours and Brights sets and also my gorgeous 2 Step Owl Punch. The label that the owl is sitting on has been raised up on 3D foams as have the cut out roses. So - it is still gloomy, wet and grey here and I have to go out to a committee meeting tonight, really not looking forward to that but as I am the secretary I had better go don't you think? I shall be back tomorrow with another Less is More card for their

Metal Steampunk.

Image
It's week 16 at the  Make My Monday  challenge blog and this week the challenge is to incorporate some metal into your card or project. This was a fun one to do - I still don't know if I have yet fully grasped the whole Steampunk style but here goes The image (if I remember correctly) comes from the Graphics Fairy, it's printed on to cream card and the edges have been sponged with Really Rust and Pumpkin Pie inks. The flowers have been stamped using one of the free Craft Stamper Mag stamps and I have added a couple of cogs to the top two and a Tim Holtz pointer to the bottom one. There is a piece of ball chain threaded through the lace and added to this are the ends of two zips. Hope you are able to join in this week or at least pop over to see what my lovely design team have come up with this week. See you soon - Jacqueline xx

Anything CAS Goes.

Image
Less is More  this week are hoping to get 1000 submissions - good luck ladies this is a fab challenge site and I hope you make it. It should be easy this week too as it's 'Anything Goes' - as long as it's clean and simple of course. Now I am working on the next promotion for my web site (more on that story later) and as all the materials were out on my work surface I decided to use them for this challenge. It's a one layer card using my Poppies stamp coloured in with Promarkers - take a look Short and sweet today as Sundays are always busy days for me - might have another go at this challenge though later in the week - bye for now - Jacqueline xx

Card Buffet at St. Luke's charity challenges.

Image
The challenge this month at  St. Luke's Charity Challenges  is a Card buffet. I'm not that good at buffets - I always eat too much! However with this challenge you only get to choose four items - here is the list A good choice don't you think? I had great fun choosing and this is what I came up with The four items I chose were 1) Patterned paper - Stampin' Up Springtime Vintage DSP 2) Punches - Stampin' Up 2 Step Owl Punch 3) Buttons - Funky Hand Button collection - Remember December 4) String - from my stash tied in the buttons. The stamp set I used is Baby Blossoms. See you soon - Jacqueline xx

Baby Blossoms Anniversary.

Image
This is my first post on my new lap top. My computer was very old and was just taking too long to do anything so for the last couple of days I have been transferring files and generally getting acquainted with my new lap top. It also takes up less space in my craft room - more room now for new stash me thinks!! Today's card is an anniversary card. I have fallen in love with the swing card shape and used a base of Pear Pizzazz card stock to start me off. This is the front and I have used some Very Vanilla card stock which has been stamped around the edge with the border stamp from Vintage Vogue using a Pear Pizzazz Stampin' Write Marker. I then changed over to the Baby Blossoms stamp set and on a separate piece of card stock stamped out numerous roses using Daffodil Delight and Tangerine Tango ink pads. These were then cut out and glued on with a glue pen. The little leaf branches have been stamped in Old Olive ink. The dotty label was stuck on using 3D foam pads to add som

Workshop News

Image
Yesterday I posted a picture of a shaker card I had made as a sample for my Tuesday morning craft club I also made this one which is a Christmas card Both of them use some Marianne Creatables dies and the second one uses a Barbara Gray Clarity stamp with the middle cut out of the O. Shaker cards were the subject of my workshop and a full tutorial on how to make one can be found  here . Jacqueline xx

Anything Goes at Marianne's Design Divas.

Image
This is just in time I think. I'm cutting it very fine but I've been away and only just got back. My card is for the challenge over on  Marianne's Design Divas . The challenge is 'Anything Goes' but you should use a Marianne D product. Here is my card I have used a 5" x 5" card base and added some pink card stock onto this I have glued some foliage which is the  Marianne D Creatables Branch Garden die and then I used the Miniature Poinsettia die which I cut in purple card stock and coloured with a white gel pen to make Clematis flowers. I used a Paper Artsy die to make an aperture into which I added some glitter and made a shaker card. I finished it off with a sentiment and a few gems in the center of the flowers - hope you like it - Jacqueline xx

Colour Challenge

Image
It's colour challenge time at  Simply Stampin'  and these are the colours we had to work with These are not colours that I would normally use together - however I think that they do work - take a look at my card  I decided on a gate fold style in the Perfect Plum and used the Whisper White as my base for stamping on. I used stamp set Simply Said, Pocket Silhouettes and the small flower from Flight of the Butterfly. The big butterfly is punched using the Butterfly punch and some smaller ones have also been punched out. Here are another couple of views of the card closed The gorgeous Melon Mambo ribbon has been attached to some punched tabs and then tied in a bow. More butterflies have been added to finish it off. Thanks for looking - Jacqueline xx

Steampunk

Image
Good morning everyone - I honestly didn't think I was going to make it this morning as my son decided to re-organise his room last night and that included moving his computer. We lost our internet connection all last night and only managed to get it back at 9am this morning. That mean't I was late getting the challenge up on the  Make My Monday  blog - but it's there now and you can hop over and take a look at our brand new theme and challenge. This month my lovely dt colleague Cath has chosen STEAMPUNK for our theme and she kicks off by challenging us to make a Steampunk inspired ATC. Here's mine I have used a 2.5" x 3.5" piece of card stock and stamped it with a Tim Holtz  Components stamp from his Stampers Anonymous range - this one being Time. I then inked it with Brushed Corduroy DI. I then added some pieces of Tim Holtz Idea-Ology  - a metal pointer and some ball chain. The pocket watch is a past free stamp from the cover of Craft Stamper mag and it h

Metal

Image
Over on  Less is More  the brief is to create a clean and simple card with 'Metal' on it. This is no bad thing because residing at the bottom of my paper and card drawer is a pack of metal foil sheets in gold, silver and bronze - bought on a whim and never used! I decided to use it with my 2 Step Owl Punch and punched out the elements in the various metallic colours. I then perched him on a branch and drew a frame around him The branch is from my Bird on a Branch set and the sentiment is from Just Believe - the frame is doodled by me! Thanks for stopping by and taking a look - hope you are enjoying your weekend - Jacqueline xx

Yikes - Autumn!

Image
Well there is definitely a nip in the air and the leaves on our cherry tree are starting to turn yellow - guess that's summer over with! Today's card is reflecting the autumnal feel as I have used the stamp set Autumn Days and the colours I have chosen are browns, oranges and golds. I also used the sketch from this week's  Simply Stampin'  challenge Here is my card I started off with a cream card base onto which I layered some Creamy Caramel card stock. I then layered with Very Vanilla. Smaller mats were cut in Really Rust and Peach Parfait. These were again layered with Very Vanilla and stamped on to with the Autumn Days set and the oak leaf from French Foliage. The pheasant has been inked up with more than one colour and cut out and attached with 3D foam pads. The ribbon is organza and matched quite nicely with the card stock and the leaves in the corner are also attached with 3D foam pads. A few gems finish it off along with a bow made from the organza ribbon.

ATC - Stamp and Swap

Image
It's the first of the month and a brand new theme on the  ATC - Stamp and Swap Blog . This month's theme is Silhouettes and here are some of mine Each one has been created using a piece of white card and a post-it-note circle to make a sun or a moon. Ink has then been sponged over to create a background. I then took some solid silhouette stamps and stamped them in black ink - or in the case of the green one - green. The green ATC has been sponged with Handsome Hunter ink and a stamp from the Stampin' Up set Pocket Silhouettes was stamped using the same ink. A piece of copy paper was ripped, placed on the upper part of the ATC and a darker layer of ink was added to make a hill. The blue ATC was sponged with Brocade Blue ink and the moon was sponged with Daffodil Delight. The stamps used are my own designs and the trees were stamped twice before re-inking to give depth to the scene. The final ATC was sponged with Pumpkin Pie ink and Chocolate Chip. The stamped image is o