Posts

Showing posts from September, 2010

Card in a Box for Project Tuesday.

Image
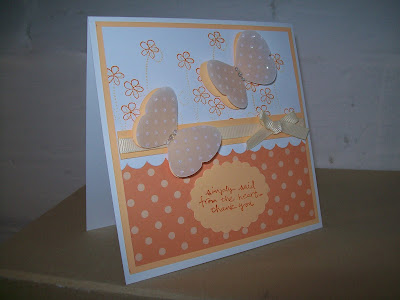
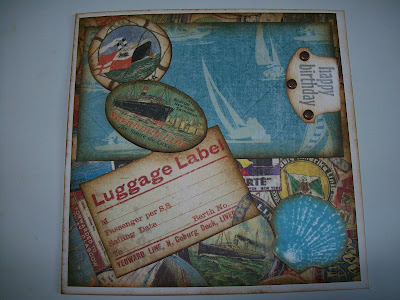
Today I thought I would share with you a card that I started Tuesday night at a club I go to. The theme of the evening was  Metal Foiling and when we had done playing with the foils (we embossed it and then coloured it with alcohol inks) we were shown a fancy folded card on which to mount our efforts. Well my foiling efforts were not very good so I changed tactics and made a different card all together. This (I think) is called a Diamond Fold Card and there are instructions on You Tube. I used some Bazzill Basics paper for the base and Stampin' Up - Old Olive. The stamps are also S'U - Vintage Vogue using Ruby Red and Chocolate Chip inks. So then I am hopping from blog to blog and I see that the challenge this week on Project Tuesday  is a Clear Sleeve Gift Box. There is a link on there to get instructions and what luck - it fits my card! The card measurers 4" x 4" and just fits into the 4" x 4" box. A piece of acetate was then wrapped around. I decorated

WOYWW.

Image
Good morning everyone. Firstly I need to make a huge appology - I received loads of lovely comments from you last week but unfortunatly I was taken ill before I could reply to most of you. Just starting to feel a litle better now and as you can see the desk is set up for a bit of playing later if I feel up to it (tablets make me feel a bit ikky in the mornings) Those of you lovely ladies who expressed an interest in atc swapping with me - I will be in touch - thank you. Don't forget to pop over to  Julia's blog  to check out this Wednesday's desk fest - Jacqueline xx.  

My First Scrapbook Page.

Image
I don't normally do scrapbooking. I've made a few memory books - for myself and for family, but 12" x 12" - I didn't go there. All that space to be filled in just scared me! Anyway I think I mentioned before about the ladies in my craft group setting me a challenge, well one lady set me the challenge of a 12" x 12" scrapbook page, using my own photos, my own colour and decoration choice and a hand cut title. The last bit stumped a little - did she mean draw my own letters and cut them out or use a die cutting machine? I don't have any alphabet dies and I really didn't trust my cutting out to be neat enough so I cheated and ignored that bit! I did however cut out all 18 flowers by hand and hand stamped the background paper. This has been done using Stampin' Up Earth Elements inks and the Vintage Vogue stamp set. The photos are of my wedding - 20 years ago in February and you wouldn't believe looking at those pics that only the week befo

WOYWW.

Image
For one reason or another I haven't played this game for a few weeks - you know the one over on  Julia's blog  - go and see if you don't know what I'm on about. I have missed playing along as I love all the lovely comments left by fellow crafters and so I have purposely made time to join in this week. My work space is quite long and this week I have managed to use up all available surfaces .........with mess! starting at the left hand end  This is the devestation left from yestersday's Project Tuesday challenge and some atc making. Moving on This is where I usualy do all my 'messy' crafting hence all the Distress Inks and paints. However at the moment there is a rather large pile of paper work in the way (meeting minutes and accounts etc) - this really needs to be tackled asap - however still moving on This is the other end where I am piling up all the bits and pieces for my workshop tomorrow night - we are doing medallion cards - so much to do so little

I Wish...

Image
Another challenge today this one is for Project Tuesday  and the project is 'Tri-Fold Pocket Card. If you pop over to the blog you will find a link there to take you to where you can find the instructions for this fab card. The green envelope bit opens but there is what's called a belly band to hold it shut. The tag inside pulls out to reveal what's inside This was made using mostly scraps of card stock and some Stampin' Up Simply Scrappin' stickers from the I Wish collection. It is very quick and simple to make and would be great as a gift card holder for Christmas. This one though I think I will give to my husband with a list of all the new Stampin' Up goodies I will be needing once the new catalogue comes out!!!!!! Thanks for looking - happy crafting everyone - Jacqueline xx

Vellum Butterflies.

Image
Hello again - just finished making this card for the challenge over on Die Cut Dreams  and I thought I would squeeze it in this evening before shutting down. The challenge this week is 'Vellum' As you can see - I have remained true to form and used all Stampin' Up materials. (Oh - except for the spotty paper - that's Anna Griffin). Stamps used - Simply Said and Flight of the Butterfly, card stock - Apricot Appeal, inks - Apricot Appeal and Pumpkin Pie (mmmm pie) and a little bit of Very Vanilla ribbon. The butterflies have been punched out with the Butterfly Punch and I used a piece of sparkly glitter vellum to overlay them. (This is a piece I have been hording for ages). Please go and check out all the other vellum lovelyness on DCD  there is some fantastic work from the DT. See you soon - Jacqueline xx.

A Brace of Pheasant Cards.

Image
Hi all - did everyone have a good weekend? I hope yours was better than mine - transport issues and my printer blew up. I managed to knab my husband's printer but it only does black and white, I started to use it and then ...... ran out of paper! I have two meetings aswell this week both of which need things printed. These things are sent to try us I suppose....... anyway it is the start of a brand new week and I have two cards to share with you. They are both very similar - but not the same. (I do try to make all my cards unique). They are both made using Stampin' Up stamp set Autumn Days and S'U cardstock and inks in More Mustard, Really Rust and Chocolate Chip. The sentiment in the middle is the freebie from the Craft Stamper magazine. Here are some closer views OK - so, short and sweet today - hope you get time to leave me a comment - it's always appreciated. Bye for now - Jacqueline xx.

In Vogue.

Image
I needed to make a small gift for someone, and I had some bits and pieces left over form the previous card so I made this - a post-it note holder. I adjusted the measurements of one demo'ed on You Tube. (Just go to You Tube and key 'post-it note holder' into the search bar and there are loads to choose from). I also used my new Stampin' Up favourite stamp set - Vintage Vogue. I love this set so much that I couldn't resist playing a little longer and I came up with this I think it was seeing a card similar to this on Vicky's  blog that made me fall in love with the set. I have used Chocolate Chip cardstock and ink, Creamy Caramel and Old Olive ink and some self adhesive, flat backed pearls. I'm off now for my Sunday Lunch - seeyou soon - Jacqueline xx .

Sapphire Anniversary.

Image
Today my Mum and Dad have been married for 45 years, so I had to mark the occasion with a special card. Sapphire is most commonly known as being blue so I chose that as the base colour of my card. The stamps I used are my new Vintage Vogue (from Stampin' Up) set, and I used S'U ink Brocade Blue. Some peel offs were added and a few blue blingy bits. Here it is open So hopefully the posty got it there on time and that they are now having a wonderful anniversary. Bye for now - Jacqueline xx.

Copy Cat.

Image
It's not that I've lost my mojo or anything, but I was browsing the web and came across this gorgeous card over on Monica's  blog. I instantly fell in love with it and decided that as I had just received some new cardstock from Stampin' Up - I would have a go at recreating it. I changed some colours and ommitted the ribbon and some stamping but the rest I'm afraid is a blatant copy! I have used Stampin' Up colours Old Olive and Ruby Red, some grey and white cardstock from my stash and a C6 card blank. Stamps used are S'U Greenhouse Garden and the sentiment is from my NEW set - Vintage Vogue. I also used S'U Scallop Edge punch and the 2 Step Bird punch. The centres of the flowers were made by using a small circle punch, Old Olive cardstock and some self adhesive pearls. I am off now to play some more with my new stamps - see you soon - Jacqueline xx.

Autumn Colours at Pollycraft.

Image
Good morning - I've been away for a week. It should have been a weekend but we had problems with our car and I ended up staying away longer (which was nice). And although the break was very nice - I didn't half miss my craft room. So much so that I didn't even unpack but headed straight to my computer in order to find a challenge to get my teeth into! Over on the Pollycraft Monday blog there is a challenge to use Autumnal Colours - click here  and I will transport you there. Before you go though please take a look at my card   This is Burt the Owl and once upon a time he was a Friday Freebie on  Tales from Pollycraft. He is a digi stamp and I coloured him in using coloured pencils. The background cardstock is Bazzill Basics - Burning Ember and the patterned paper is from Basic Grey. Some Stampin' Up stamps and inks made the little flowers and the sentiment is also from Pollycraft. Hope you like him - see you soon - Jacqueline xx.

Last of the Lovely Trees.

Image
Hi folks, I think I mentioned in one of my previous posts that I had recently been to a Stampin' Up party and that while I was awaiting the delivery of 'New Stash' was playing with Lovely as a Tree. Well this is the last - I think I am all played out with the trees - at least for a little while. This is the card we all made at the party This was made using Chocolate Chip and So Saffron card stock and a small piece of the Naturals Ivory. The tree in the foreground was attached using dimensionals which added a nice 3D effect. I then had a play at home and came up with something a little similar The main card stock is Bazzill Basics - Burning Ember with a small piece of S'U Bravo Burgundy to make a frame and a mat behind the trees. This is actually a 'Recessed Window Card' and the trees on the frame have been stuck on with 3D foam pads - it might be easier to see this in the next picture I thought that this would be a good 'man' card - they are so diff

More Lovely as a Tree.

Image
It's been a long time since I was last in my craftroom, I spent the weekend clearing out my sun porch (it's not grand enough to be called a conservatory) and then decorated my downstairs loo - nothing special just a lick of paint and some new curtains. OMG - you should have seen the size of the spiders in my porch I swear they were the size of mice! I hate spiders sooooo much. Hopefully they are all gone now. My cards for you today are again made using the Stampin' Up set Lovely as a Tree with some inspiration taken from the Splitcoast Stampers gallery. This one is using So Saffron card stock along with a little Handsome Hunter and Bravo Burgundy . And this one used Handsome Hunter and Certain Celery. Thanks for stopping by - Jacqueline xx.

Lovely Trees.

Image
Hello lovely crafters - it's hard to believe that the school holidays are over and my son is returning to school on monday. Which means no more sleeping in but getting up early and making sandwiches and making sure he doesn't miss the bus. Daughter on the other hand is having a fine time doing nothing at all while filling in on-line recuitment forms. Although she she got two B's and a C she has defered her uni place 'till next year. So, I bring before you today another Christmas Card (could also be a New Year card). I went to a Stampin' Up party a couple of nights ago where I ordered some new stash (Vintage Vogue set eek....can't wait to get it!) and while I await it's arrival I have been playing with my Lovely as a Tree set. That was the set that was showcased on the night and everyone had a great time and made some stunning cards. (My friend Jane also put on some very tasty refreshments and there was wine - very nice). So back to the card - here it is

All Aboard.

Image
What a lovely sunny 1st of September we are having - yikes September, time just seems to be racing by! Today I thought I would share with you a challenge card. It isn't a blog challenge as usual but one set for me by one of the ladies of my craft group. I normally challenge them but this month the tables have been turned and each of my ladies have set me a challenge. This is 'A birthday card suitable for a man'. Colour was my choice but I had to include 2 decorative papers, 1 stamp, a sentiment and 3 brads. How did I do? My 2 decorative papers came from the Sea Glass range from K & Company and I also cut out some of the images of one piece to decoupage. My 1 stamp is the seashell which was a freebie on the cover of Craft Stamper magazine and I put my 'Happy Birthday' sentiment on a tab secured with the 3 brads. The edges of all the paper and card stock were inked with Brushed Corduroy distress ink. Now I can't tell you who set this challenge as the game i